Platformer tutorial, Part 1: The basics
Introduction
Welcome in this first(?) part of doing a game in Unity
I chose to do a platformer since it is a bit of the "classical" game to do, also a really common occurance in NSFW games
With this tutorial we'll see the very basics of what we need for that:
- Having a character moving and jumping
- Adding animations
- Adding a very basic "trap" that reset the enemy position on collision
- Having a camera following the player
I'm not a teacher or a Unity expert, so I just hope that my experiences so far will be able to help you through this
For this tutorial, I'll assume you already know C# and have some basics in Unity
Saying that, let's start
Creating a new project
First step, let's create a project, on my side I also made a repo for this project which I'll continue over the various tutorial, if you want to get my version of things
For this I'll use Unity 2022.3.21f1 which is the current LTS and create the project as 2D (URP) in case we want to do fancy light stuff
Since I'm pushing on GitHub I'll also import Unity's gitignore from GitHub where I'll append the following:
.vscode/
/[Aa]ssets/TextMesh Pro/
/[Aa]ssets/TextMesh Pro.meta
Which are temp files from VS Code (that I use along Visual Studio) and Text Mesh Pro assets that we can easily re-import when we need them
I will also rename my "SampleScene" scene to "Main", because I like it this way
Now we also need to import some packages we will need, for that go Window > Package Manager, at the top left change Packages: In Project to Packages: Unity Registry and on the top right bar search for:
- Cinemachine: give us a better camera to work with, we will speak of that again later on
- Input System: will allow us to have better control of our inputs, installing this one will restart our editor but it's okay
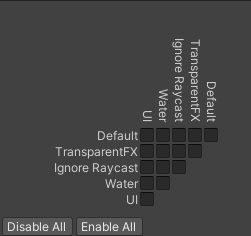
Our last step, let's clear our collision matrix to get rid of what we don't want
Let's click on Edit > Project Settings and in the new window, let's go in Physics 2D and Layer Collision Matrix, from here let's just tick Disable All, don't close this window we will add things back once we need them
Adding a player
Now that we are here, let's make the player
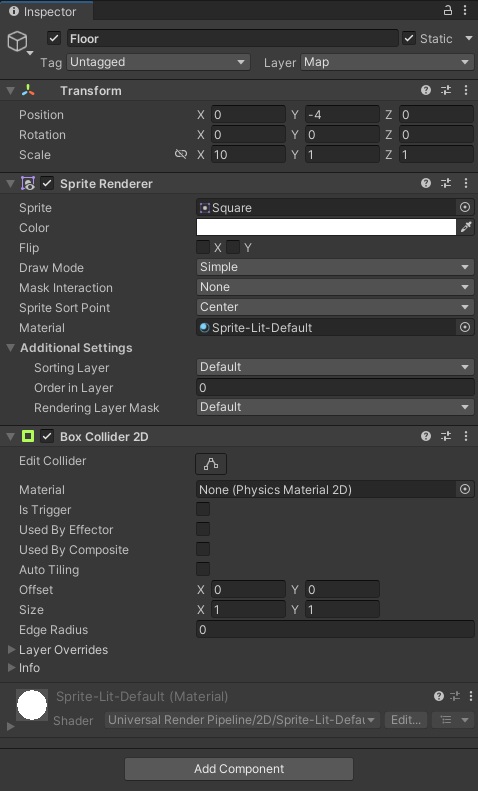
First we will add a basic floor, so let's add a squared sprite in our game and give it a 2D box collider
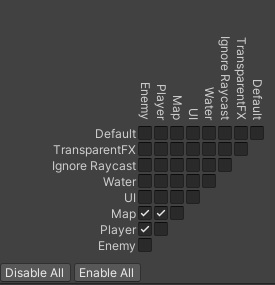
We will also go in Layer (at the top), Add Layer... and in User Layer 6 we will write "Map", which will be all the map layers we can collide with
Since we are here let's add "Player" for our player, and "Enemy" for our enemies
We can then go back on our collision matrix and update it by ticking what can collide with what:
Player with the map, enemy with the map and player with the enemy
Let's go back on our platformer and change its layer to "Map", and its name to "Floor"
We might also check the static box next to that, since this floor won't move
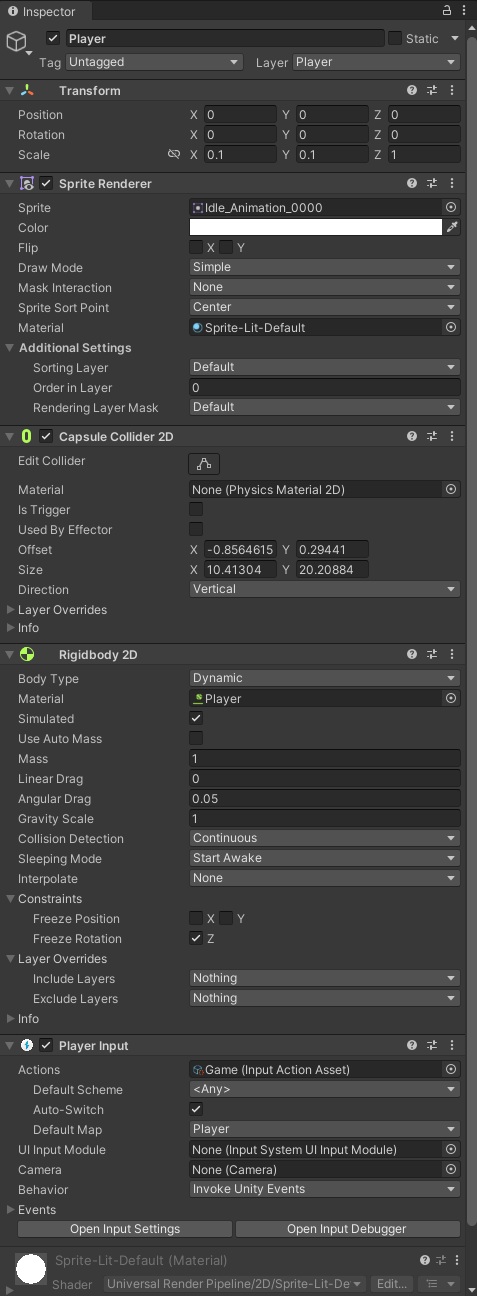
I'll also change it's scale to (10; 1; 1) and position to (0; -4; 0)
Let's now add a player on top, we create a new capsule sprite, capsule will, compared to a box, prevent the edges of our colliders to be caught in the corners of our platforms
The counter-part is that it'll however make the physics a bit janky around the edges, so both options are actually discutable
We rename the object Player, change the layer to Player too and our scale to (.1, .1, 1) since my sprite is a bit big
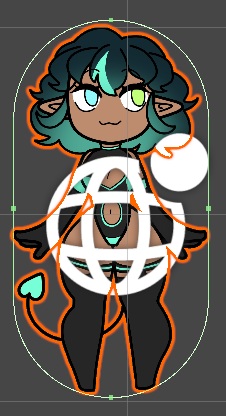
For sprite renderer, and since I can draw as good as a starving sheep, I'll reuse the sprite from our first jam, where I'll import the "Idle" and "Running" folders, inside a "Sprites" folder of my own
From that, I set the Sprite value of my renderer to Idle/Idle_Animation_0000
We then add a capsule collider 2D, the default collider have a circle-like shape so we click on the button next to Edit collider and from the scene view drag & drop the small green squares to make our colliders fit better
Now let's do our physics, for that we add a Rigidbody 2D
First let's change our Collision Detection from Discrete to Continuous, this trade a bit of performances for better collision handling (instead of checking collisions at the current frame, it also check the in-between positions, allowing us to not miss a collision even at high speed), more information about that on the Unity documentation
In constraints we then check the Freeze Rotation box, since we don't want the physics to make the player rotate on itself
Our next step is creating a Physics Material 2D, I'll do that in my Settings folder, therefore making a new Asset in 2D > Physics Material 2D and change the friction from 0.4 to 0.
This is because by default, if you fall from a platform but continue moving against a it, friction will allow us to stay stuck on it instead of just falling down
By removing the friction we prevent that
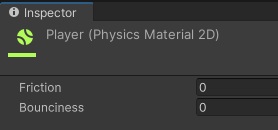
Once created, we assign the material to our object
If you jump into play mode, our player should now fall and stop when it collides with the platform
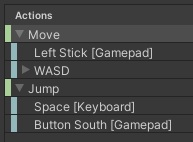
Now for the controls, let's add a Player Input script, we will click the Create Actions... button to set our controls, I'll call it Game.inputactions and put it in my Settings folder
By default we have 3 controls:
- Move: Handle our movements, by default with WASD but also handle other layout for others countries (like ZQSD for AZERTY keyboards)
- Look: Handle mouse movements, we can delete this one as we won't need it
- Fire: Handle mouse clicks, we won't need this one either
Now we need to add Jump action, for that we click the + at the left of Actions and name our new action "Jump"
We click on No Binding to assign it, under Use in control scheme select Keyboard/Mouse and in Path write "Space" and select Space (Keyboard)
Next to our Jump action we click the + to create a new binding, this one will be for gamepad.
We click on Add Binding and this time select Gamepad as control scheme, in Path we go in Gamepad and choose Button South
Since I'm only planning to handle keyboard and gamepad, I'll delete things related to touch inputs, joysticks or XR
We click on Save Asset at the top left and we can close the window
Going back on our Player, we will also change the Behavior from Send Messages to Invoke Unity Events, this will allow us to create a method in our script, assign it from this component and directly receive events there with our input information
Player Controls
Let's see how to make the player script now, so we can move
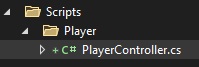
Let's create a "Script" folder, inside another folder named "Player" to put all our player related scripts, and our script inside that we will name PlayerController.cs
First let's get rid of all the stuff we don't need, the two System usings that are unused and the Start and Update methods, that are unused too
On top of that, let's wrap our script inside a namespace, which will be the name of our project followed by the names of our containing folders, this will allow to avoid some conflict with potentially others classes coming from others libraries
using UnityEngine;

namespace TutorialPlatformer.Player
{
    public class PlayerController : MonoBehaviour
    {
    }
}
Now let's do the controls, for that we need to read our input and modify the velocity of our rigidbody accordingly
To ensure our rigidbody stays with our object we can first add a RequireComponent attribute on our class
Then let's have a variable to store on rigidbody and load it in the Awake
Awake being called before Start, I usually use that to init all variables that only depend of the current object where I use Start for variable that depends of others scripts
using UnityEngine;

namespace TutorialPlatformer.Player
{
    [RequireComponent(typeof(Rigidbody2D))]
    public class PlayerController : MonoBehaviour
    {
        private Rigidbody2D _rb;

        private void Awake()
        {
            _rb = GetComponent<Rigidbody2D>();
        }
    }
}
Now let's handle reading the inputs, let's create a "OnMove" method that takes an InputAction.CallbackContext parameter, we need to make it public so we can set it from our Player Input component
Since we can only left or right (apart from jumping) we then create a float and read the value of our parameter inside, only taking the X value
(If the using isn't automatically added by your editor, add using UnityEngine.InputSystem; at the top)
The value we get however is normalized by default, which mean that if you're going at the same time up and right, the total length of what ReadValue returns will be 1, and therefore the X component will be around 0.7
Since we don't want to change the speed depending of the up value, let's do a small if else to always have -1, 0 or 1
Now that this is done, let's actually move our player left and right, let's add a FixedUpdate method (we use that compared to Update when we do things that are physics based) and inside let's set our rigidbody velocity, X value will be the variable we assigned, and Y is our current velocity
using UnityEngine;
using UnityEngine.InputSystem;
namespace TutorialPlatformer.Player
{
[RequireComponent(typeof(Rigidbody2D))]
public class PlayerController : MonoBehaviour
{
private Rigidbody2D _rb;
private float _xMov;
private void Awake()
{
_rb = GetComponent<Rigidbody2D>();
}
private void FixedUpdate()
{
_rb.velocity = new(_xMov, _rb.velocity.y);
}
public void OnMove(InputAction.CallbackContext value)
{
_xMov = value.ReadValue<Vector2>().x;
if (_xMov < 0f) _xMov = -1f;
else if (_xMov > 0f) _xMov = 1f;
}
}
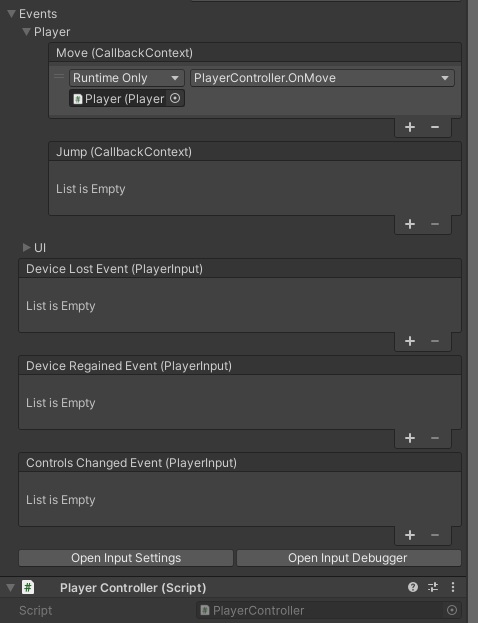
}Now let's go back to Unity a bit, let's add our new script to our player, and on our Player Input component let's go in Events > Player > Move and we can drag & drop our player object here, and select PlayerController > OnMove
If we start the game, we can now move our player left and right!
We can however notice that we are quite slow, so let's solve that
To do things properly, let's use Scriptable Objects, they allow use to group variables like these, often used for game design, at a same place
This can be very conveniant when you (and any non-technical person you might work with) want to modify them without touching the code or messing with your components, or just having a way to have everything centered
Let's create a "SO" folder inside Scripts, and make a PlayerInfo.cs class

We do as before, remove useless things, and this time, instead of inheriting MonoBehavior we inherit ScriptableObject, we also add a CreateAssetMenu attribute on our class, and make our new asset point to ScriptableObject/PlayerInfo
Inside our script, let's just create a "Speed" variable, public and type float
using UnityEngine;

namespace TutorialPlatformer.SO
{
    [CreateAssetMenu(menuName = "ScriptableObject/PlayerInfo", fileName = "PlayerInfo")]
    public class PlayerInfo : ScriptableObject
    {
        public float Speed;
    }
}
public variable aren't a good practice but in that specific case, I need one so Unity can access it and we can get it from our player
Making a separate property would work but would make our code quite heavier on the long run
Once this is create, let's go back to our PlayerController script and add a variable we will set from Unity that will contains our info, this time we can be good and set it as private with a SerializeField attribute
[SerializeField]
private PlayerInfo _info;
Let's also update our FixedUpdate and multiply our X velocity by our speed
_rb.velocity = new(_xMov * _info.Speed, _rb.velocity.y);If it doesn't recognize PlayerInfo, don't forget to add a using for the namespace! using TutorialPlatformer.SO; for me
Now let's go back in Unity and make a ScriptableObjects folder at the root of our Assets folder
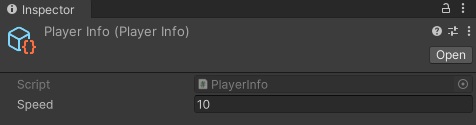
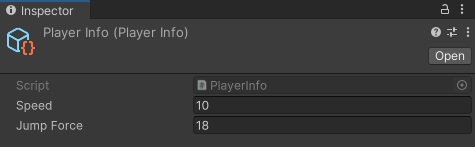
If we go back on creating a new asset (Assets/Create/) you now have a ScriptableObject > PlayerInfo sub-menu, let's create it, on our new object we can click on it and set a default speed value from the inspector, let's say 10 for now
Now we just assign the variable from Unity and we are good!

We can start the game again and see us moving left and right at quite a good spped!
Jumping
What would be a platformer without jumping
So let's code that
First let's modify our scriptable object to add a jump force as a float
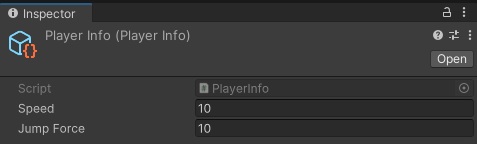
public float JumpForce;And gives it a value in Unity of, let's say, 10
Just the jumping itself is rather straightforward, we first make a "OnJump" method as we did with "OnMove"
Inside we need to check when we press the spacebar, which is if the performed attribute of our parameter is true
When that's the case, we just set our Y velocity to a given value, we don't use AddForce so we don't become a rocket-girl if already having a velocity
public void OnJump(InputAction.CallbackContext value)
{
if (value.performed)
{
_rb.velocity = new(_rb.velocity.x, _info.JumpForce);
}
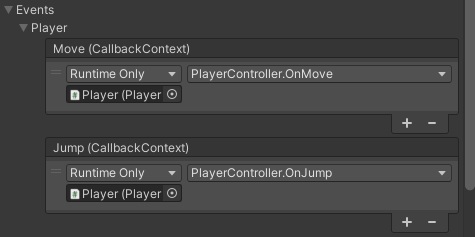
}We don't forget to assign it in the Player Input
We can now start play mode, and spacebar indeed jump, however pressing it many time make us fly away
To prevent that we need to know if we are on the floor, for that we can do a raycast and see if it hits the floor
The goal of a raycast it to fire a ray in a direction and detecting the first object it collides with
Physics2D.Raycast have a lot of potential arguments, the one that interest is this one:
public static RaycastHit2D Raycast(Vector2 origin, Vector2 direction, float distance, int layerMask)- "origin" is our position, so
transform.position - "direction" is where we aim at, so down:
Vector2.down - "distance" is the max distance of the raycast, so our base distance to the floor, we don't know it yet so let's just put
float.MaxValue - "layerMask" define what layer the raycast will hit, in our case we want it to hit the "Map" layer
But let's explain a bit the layer mask
If you did the steps above, you created a "Map" layer on User Layer 6, you can also get this value back by doing LayerMask.NameToLayer("Map")
We won't go too deep in the details and generalize a bit, but our layer mask is represented as a int, so 32 bits, which is
0000 0000 0000 0000 0000 0000 0000 0000To only collide with the Map layer, we need to only tick the bit of our layer, which is 6, so our 6th bit
0000 0000 0000 0000 0000 0000 0010 0000So achievement that, we can do it that way:
int targetLayer = 1 << LayerMask.NameToLayer("Map");Let's store our layer mask in a variable so we don't have to call this method everytimes
private int _mapLayer;

private void Awake()
{
    _mapLayer = LayerMask.NameToLayer("Map");
We also store the result of Physics2D.Raycast in its own variable
Which at the end gives us
var hit = Physics2D.Raycast(transform.position, Vector2.down, float.MaxValue, 1 << _mapLayer);Our raycast only hit something if the collider member of our result is null, so let's do a quick null check
If it hits, let's add a small debug to see the distance of the ray, with the distance member of our variable
Which gives us
public void OnJump(InputAction.CallbackContext value)
{
    if (value.performed)
    {
        var hit = Physics2D.Raycast(transform.position, Vector2.down, float.MaxValue, 1 << _mapLayer);

        if (hit.collider != null)
        {
            _rb.velocity = new(_rb.velocity.x, _info.JumpForce);
            Debug.Log(hit.distance);
        }
    }
}
Let's start play mode, wait for the player to fall on the platform, hit spacebar and check the console
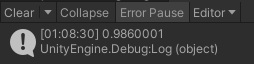
So if we are at 0.9860001 or under on my case, we are on a platform, let's round this to 1 just to give a bit of leaway
And we can update our raycast accordingly
var hit = Physics2D.Raycast(transform.position, Vector2.down, 1f, 1 << _mapLayer);Let's now tackle our next bug, move your player to the border of the player so half your player is outside it
Apart from the fact that the capsule collider makes it a bit of a pain to stay immobile, you'll notice that you can't move
This is because the raycast is done from the center of our player, that in this case is over nothing
So let's do a raycast from the left and right border of our player to check both extremity of it
Let's save the position of our borders in an array, I'm not sure what they will be so I'll put -1 and 1 for now
private readonly float[] _raycastPos = new[] { -1f, 1f };We can now iterate on it and make our raycast at these positions, changing our origin position
public void OnJump(InputAction.CallbackContext value)
{
    if (value.performed)
    {
        foreach (var d in _raycastPos)
        {
            var hit = Physics2D.Raycast(transform.position + Vector3.right * d, Vector2.down, 1f, 1 << _mapLayer);

            if (hit.collider != null)
            {
                _rb.velocity = new(_rb.velocity.x, _info.JumpForce);
            }
        }
    }
}
To know where we are shooting, let's also use gizmos to debug our ray, it'll also help us in the long run to know what is happening
For that I'll first center our raycast on another method to know if a ray hit so we can reuse it
private bool DoesRayHit(float xPos)
{
    var hit = Physics2D.Raycast(transform.position + Vector3.right * xPos, Vector2.down, 1f, 1 << _mapLayer);

    return hit.collider != null;
}
And edit our previous method accordingly
public void OnJump(InputAction.CallbackContext value)
{
    if (value.performed)
    {
        foreach (var d in _raycastPos)
        {
            if (DoesRayHit(d))
            {
                _rb.velocity = new(_rb.velocity.x, _info.JumpForce);
            }
        }
    }
}
Gizmos are drawn in the OnDrawGizmos method, so let's add it
We will iterate on our raycast positions and edit the color of our gizmos if it hit or not, using Gizmos.color
We now can draw our raycast with Gizmos.DrawLine, which takes the starting position of our ray (transform.position, adding our offset on X) to where it'll land, which is our position plus the size of our raycast, let's store that later part in a variable in case we change it later on
private const float RaycastDist = 1f;We update the raycast
var hit = Physics2D.Raycast(transform.position + Vector3.right * xPos, Vector2.down, RaycastDist, 1 << _mapLayer);And our Gizmos code
private void OnDrawGizmos()
{
    foreach (var d in _raycastPos)
    {
        Gizmos.color = DoesRayHit(d) ? Color.green : Color.red;
        var startPos = transform.position + Vector3.right * d;
        Gizmos.DrawLine(startPos, startPos + Vector3.down * RaycastDist);
    }
}
Let's check the scene view
The rays are too far from the collider, let's twist the values a bit
On my side, and because the sprite is not well aligned, I end up on -0.6 and 0.44
private readonly float[] _raycastPos = new[] { -.6f, .44f };
Our last step since we are at it, let's fix our weird jump, since I find the gravity a bit slow I'll increase it in Physics2D > General Settings > Gravity to -50

And increase the jump force to 30
Animations
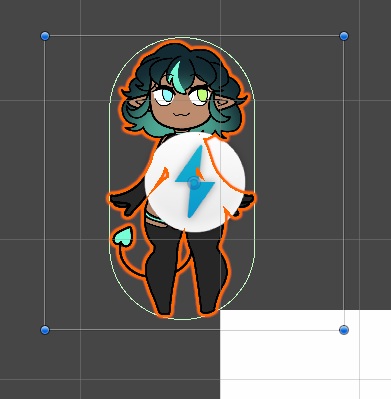
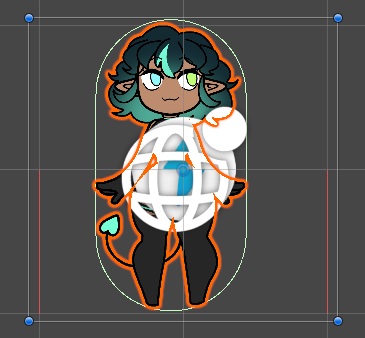
Our player sprite is a bit static when moving so let's assign it an animation
For that we go in Window > Animation > Animation
We select the player in the hierarchy to have a button to create a new animator (manage transitions between a group of animations) and animation clip there
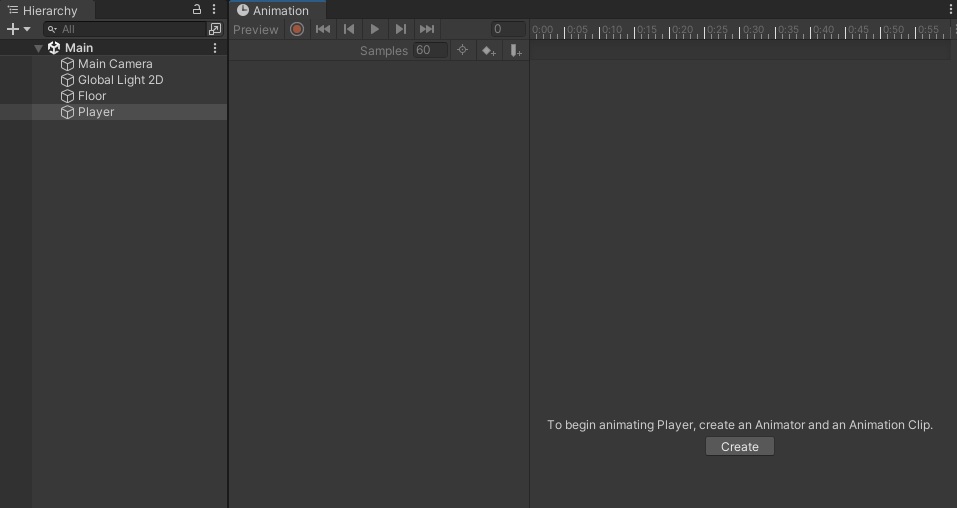
We click it and create an Animations folder in Assets, and a Player subfolder inside, then put our asset inside, we name it Idle.anim
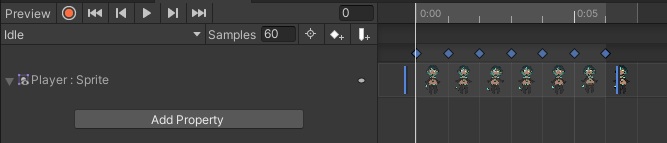
We then select all our sprites (left click on the first one, stay shift pressed and click on the last one) and drag & drop them in the editor
We click on the drop down menu at the top left containing the name of the current animation (Idle) then select Create New Clip...
We call this one Jump, I don't have a jump animation so I'll just use of my running sprite alone
We repeat this for our running animation

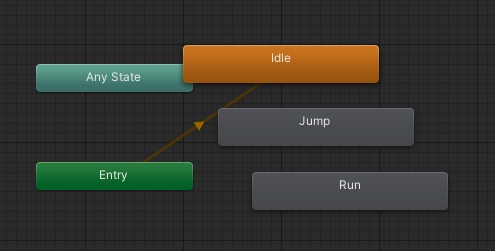
We then go in Window > Animation > Animator, which contains all our transitions and will look like this:
Let's create some parameters at the top left, with the small +
We will have two booleans, "isRunning" and "isJumping"

Jumping is prioritary on everything, then we check the moving condition
Let's start our transitions by the idle to jumping one
Do a right click on Idle, select Make Transition and click on Jump

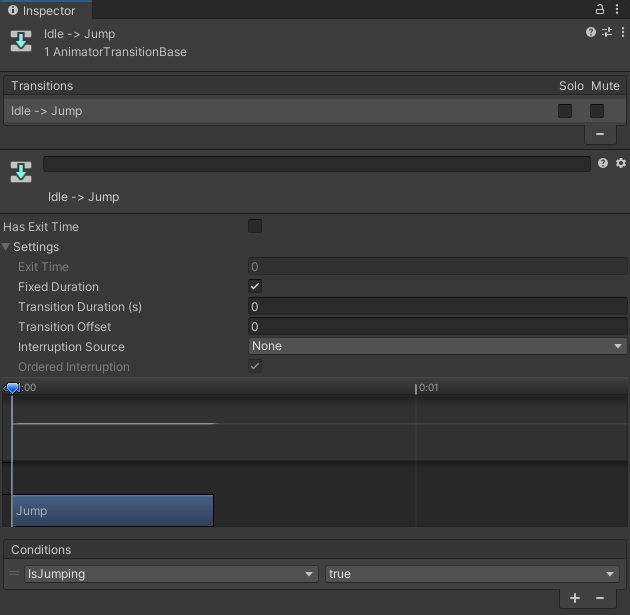
Let's click on our new arrow, at the right you see transition information
Transition Duration is useful to go back to a default state after a bit of time or to make 2 animations blend together on 3D projects
This is not our case so let's put Transition Duration to 0 and untick Has Exit Time
At the bottom, let's add a new condition, and have "IsJumping" to true
Reverse condition, jumping to idle is "IsJumping" to false and "IsRunning" to false

Let's do the rest:
- Idle to run is "IsJumping" to false and "IsRunning" to true
- Run to idle is "IsJumping" to false and "IsRunning" to false
- Run to jump is "IsJumping" to false
- Jump to run is "IsJumping" to false and "IsRunning" to true
Don't forget the transition duration and here we are!
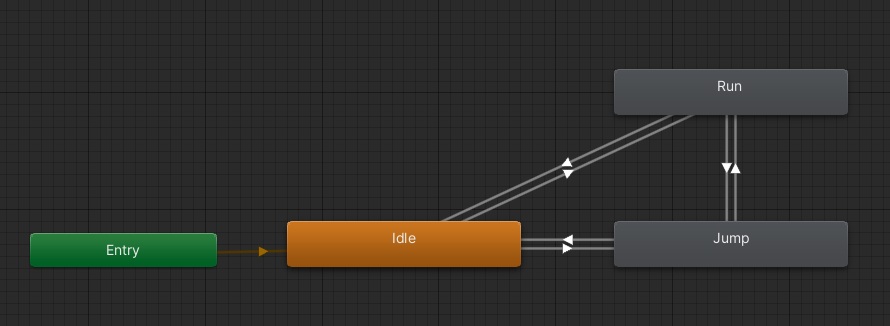
And here we are!
Now let's go back to our PlayerController
As for the Rigidbody 2D, we store the Animator component too
[RequireComponent(typeof(Rigidbody2D), typeof(Animator))]
public class PlayerController : MonoBehaviour
{
    // [...]
    private Animator _anim;

    // [...]
    private void Awake()
    {
        _anim = GetComponent<Animator>();
To set our parameter, we use the SetBool method of our animator, which take the variable we want to update and its corresponding new value
For the running it's quite easy, when receiving an input, we check if it is different than 0
public void OnMove(InputAction.CallbackContext value)
{
    // [...]

    _anim.SetBool("IsRunning", _xMov != 0f);
}
For jumping, we need to set it when we are mid-air
So let's create a method to know if we are on the floor
private bool IsOnFloor()
{
    return _raycastPos.Any(x => DoesRayHit(x));
}
And simplify our jump method
private bool _isMidair;

// [...]

public void OnJump(InputAction.CallbackContext value)
{
    if (value.performed && IsOnFloor())
    {
        _rb.velocity = new(_rb.velocity.x, _info.JumpForce);
    }
}
We can then check if we are mid-air from our Update method and apply the corresponding animator value
private void Update()
{
if (_isMidair && IsOnFloor())
{
_anim.SetBool("IsJumping", !IsOnFloor());
}
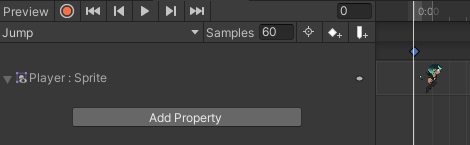
}We can now start our game and see that it works well but... Animations are extremely fast, this is because we have our animation as a sample rate of 60 and our sprites very close to each other
To solve that let's just go in our animator, select all our clips and in the inspector set the Speed for all of them at let's say 0.1
Our last problem, the player always look right
For that we need to change the flipX value of our Sprite Renderer, for that let's get our component from our script as for the Rigidbody 2D and the Animator
[RequireComponent(typeof(Rigidbody2D), typeof(Animator), typeof(SpriteRenderer))]
public class PlayerController : MonoBehaviour
{
    // [...]
    private SpriteRenderer _sr;

    // [...]
    private void Awake()
    {
        _sr = GetComponent<SpriteRenderer>();
Then in our "OnMove" callback, we flip our sprite if our horizontal speed is inferior to 0
We set it back to right only if it's superior to 0 so if it's at 0 it keeps our last orientation
We already have a check on the position so let's reuse it
public void OnMove(InputAction.CallbackContext value)
{
    _xMov = value.ReadValue<Vector2>().x;

    if (_xMov < 0f)
    {
        _sr.flipX = true;
        _xMov = -1f;
    }
    else if (_xMov > 0f)
    {
        _sr.flipX = false;
        _xMov = 1f;
    }

    // [...]
}
Let's try again, everything works!
Enemies
Let's continue with a very basic enemy: more like a trap, on contact it reset the player position
We create a new sprite, add a collider, layer on enemy and set the sprite
I still didn't learn to draw since the start of this tutorial so I import the sprite from the other project as well
To know what we hit, let's also give it a tag, on the top of the inspector select the tag drop down menu and press Add Tag... and add one named "Enemy" to the list

Go back on the enemy and assign it
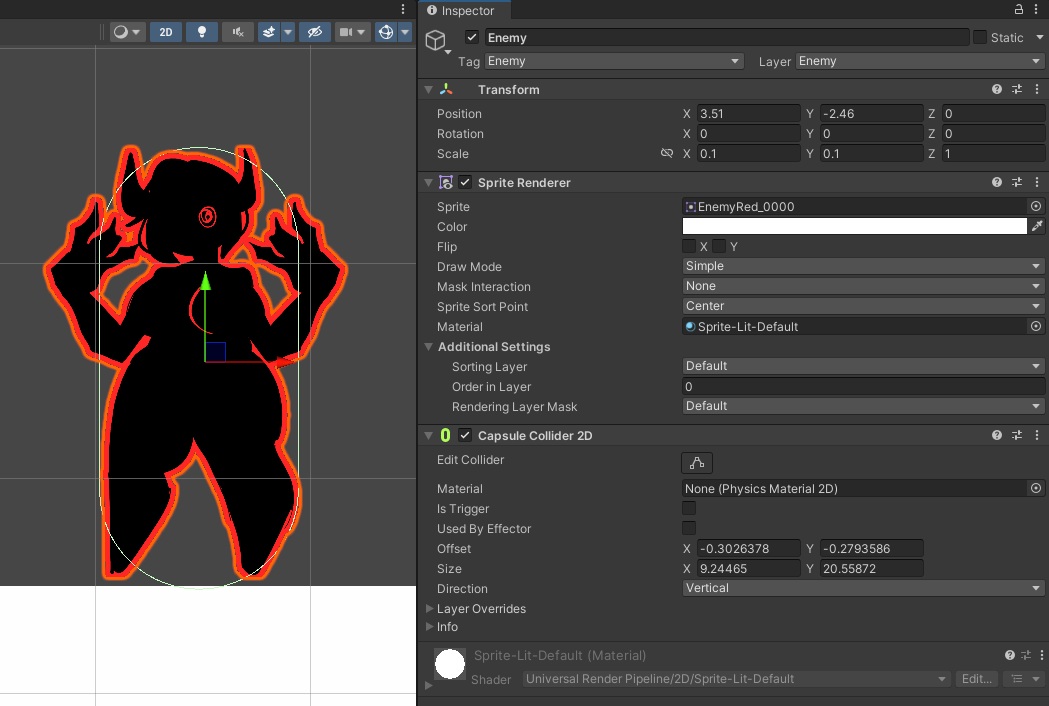
My collider eat a bit on my enemy sprite but I base it on my sprite legs so the player don't feel like he got hit by hitting nothing
Let's go back on our PlayerController and check when we hit it
We know that when it'll happen we want to reset our player position, but for that we need to know it
So let's create a variable and store our starting position on Awake
private Vector2 _startPos;

private void Awake()
{
    _startPos = transform.position;
To detect collision we can then use OnCollisionEnter2D method that takes a Collision2D as a parameter
Collision2D just contains information about the collision, but it has a collider member that will give us the object we collided with
We use the CompareTag method on it to ensure we are colliding with the "Enemy" tag
If it's the case, we want to reset our position
private void OnCollisionEnter2D(Collision2D collision)
{
    if (collision.collider.CompareTag("Enemy"))
    {
        transform.position = _startPos;
    }
}
Let's add a quick animation for our enemy, we open our animation window, click on our enemy then click the create button
I drag & drop the sprites in the animation tab and only thing left will be to go in our animator and reduce the animation clip speed, 0.4 seems a good fit to me
Camera
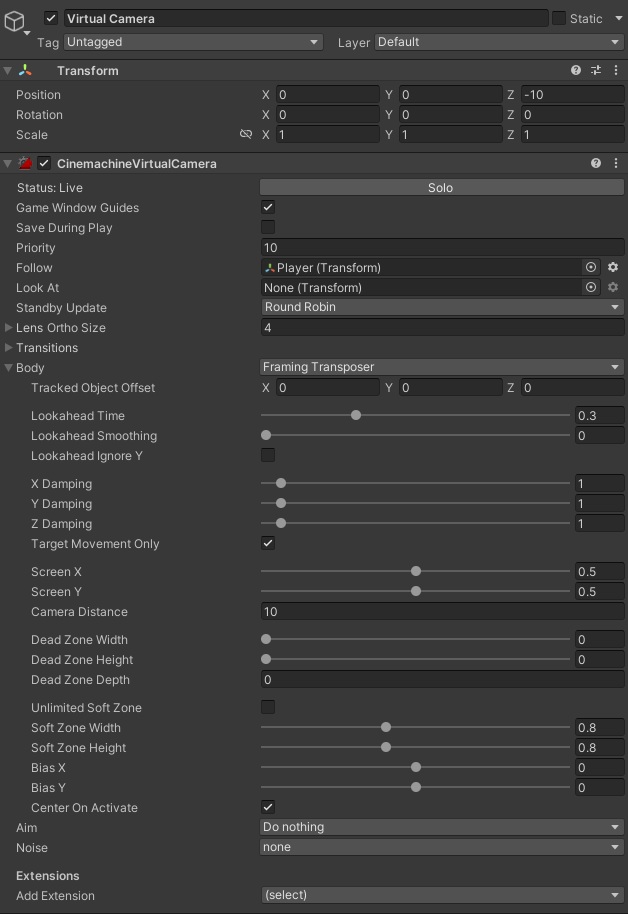
Our last step is the camera, for that let's go in the hierarchy and use the power of cinemachine
We do a right click there and go in Cinemachine > Virtual Camera
Let's put back its base position at (0, 0, -10) for now, the -10 on the Z axis is very important, if you put it to 0 you won't be able to see the player since it'ld be on the same depth position
We can see that we have a warning sign on the Body and Aim part, it's because respectively our Follow and Look At variables are empty
For `Follow we will just drag & drop the player there, since we want the camera to follow it
And for Look At, this might be useful in 3D but for us we want the camera to always look at the background so instead we change the Aim value from Composer to Do nothing
My player being a bit too zoomed-in I'll also change the Lens Ortho Size to 4, the higher, the more zoomed-out it'll be
I would rather have my camera to look where I'm running, since it's where enemies will be at so I'll also change my Body from Transposer to Framing Transposer and change Lookahead Time from 0 to 0.3
This is it for the base settings of our camera, Cinemachine is a very powerful library and camera can be a very easily overlooked element in video game dev, Game Maker's Toolkit made a very great video on 2D camera which I highly recommand you to look at
Conclusion
We now have our very basic platformer, of course there are still plenty of improvements to do, our "enemies" are for example quite basic for now, a next step would be to make them move, and maybe be killed depending of some condition
Meanwhile don't hesitate to experiment on what was said here, change random values in components, try to do things others way than what I did or try to add new features
I hope you found this article useful and thanks for reading until this point
Appendix
Code is available on the GitHub but I'll also throw our current scripts here if you want to quickly grab them, or just use them as a reference for the previvous points
PlayerInfo.cs
using UnityEngine;

namespace TutorialPlatformer.SO
{
    [CreateAssetMenu(menuName = "ScriptableObject/PlayerInfo", fileName = "PlayerInfo")]
    public class PlayerInfo : ScriptableObject
    {
        public float Speed;
        public float JumpForce;
    }
}
PlayerController.cs
using System.Linq;
using TutorialPlatformer.SO;
using UnityEngine;
using UnityEngine.InputSystem;

namespace TutorialPlatformer.Player
{
    [RequireComponent(typeof(Rigidbody2D), typeof(Animator), typeof(SpriteRenderer))]
    public class PlayerController : MonoBehaviour
    {
        [SerializeField]
        private PlayerInfo _info;

        private Rigidbody2D _rb;
        private Animator _anim;
        private SpriteRenderer _sr;

        private float _xMov;
        private int _mapLayer;
        private Vector2 _startPos;

        private readonly float[] _raycastPos = new[] { -.6f, .44f };
        private const float RaycastDist = 1f;

        private void Awake()
        {
            _rb = GetComponent<Rigidbody2D>();
            _anim = GetComponent<Animator>();
            _sr = GetComponent<SpriteRenderer>();

            _startPos = transform.position;
            _mapLayer = LayerMask.NameToLayer("Map");
        }

        private void Update()
        {
            _anim.SetBool("IsJumping", !IsOnFloor());
        }

        private void FixedUpdate()
        {
            _rb.velocity = new(_xMov * _info.Speed, _rb.velocity.y);
        }

        private void OnCollisionEnter2D(Collision2D collision)
        {
            if (collision.collider.CompareTag("Enemy"))
            {
                transform.position = _startPos;
            }
        }

        private bool DoesRayHit(float xPos)
        {
            var hit = Physics2D.Raycast(transform.position + Vector3.right * xPos, Vector2.down, RaycastDist, 1 << _mapLayer);

            return hit.collider != null;
        }

        private bool IsOnFloor()
        {
            return _raycastPos.Any(x => DoesRayHit(x));
        }

        public void OnMove(InputAction.CallbackContext value)
        {
            _xMov = value.ReadValue<Vector2>().x;

            if (_xMov < 0f)
            {
                _sr.flipX = true;
                _xMov = -1f;
            }
            else if (_xMov > 0f)
            {
                _sr.flipX = false;
                _xMov = 1f;
            }

            _anim.SetBool("IsRunning", _xMov != 0f);
        }

        public void OnJump(InputAction.CallbackContext value)
        {
            if (value.performed && IsOnFloor())
            {
                _rb.velocity = new(_rb.velocity.x, _info.JumpForce);
            }
        }

        private void OnDrawGizmos()
        {
            foreach (var d in _raycastPos)
            {
                Gizmos.color = DoesRayHit(d) ? Color.green : Color.red;
                var startPos = transform.position + Vector3.right * d;
                Gizmos.DrawLine(startPos, startPos + Vector3.down * RaycastDist);
            }
        }
    }
}